Creating a core node: 4
5. Adding the plugin functionality
Back in the file splitvel_imp.cpp, we first need to register the description. This line does that:
MAXON_CORENODE_REGISTER_PURE(SplitVel, microbion::SPLITVELOCITY::SPLITVELNODE::GetId());
We can see that this macro takes the class SplitVel, and then uses the namespaces we created to get the ID of the description. That?s the reason for those nested namespaces. If there was more than one description in the database, this would let us distinguish between them.
In the class SplitVel, we need to add variables for the ports that will be used. There are three, and they are assigned as class-level public variables like this:
class SplitVel

      {

      public:
      ??MAXON_PORT_INPUT(maxon::Vector, velocity);
      ??MAXON_PORT_OUTPUT(maxon::Vector, direction);
      ??MAXON_PORT_OUTPUT(maxon::Float, speed);
So we have two output ports and one input port, each of which is passed the data type for that port and, very importantly, its ID value from the description we created.
Finally (and it really is finally!) we can write the actual implementation of the port. To do this we override the Process() function of the BasicMicroNode class. This function is passed a list of all the ports we are going to use. We need to take especial note of the ?const? keywords in this. Here is the Impl class in full:
class Impl : public BasicMicroNode

      {

      public:
      ??MAXON_ATTRIBUTE_FORCE_INLINE maxon::Result<void> Process(const Ports<velocity, direction, speed>& ports) const
      ??{
      ????iferr_scope;
     ????const maxon::Vector vel = ports.velocity();
      ????const maxon::Float spd = vel.GetLength();
      ????maxon::Vector vel2 = vel.GetNormalized();
     ????ports.direction.Update(vel2);
      ????ports.speed.Update(spd);
      ????return maxon::OK;
      ??}

	  };
The Process() function takes the three ports to use, then gets the value of the input port (the velocity vector). Next it gets the length of the vector to obtain the speed and finally normalizes it to give the direction without speed. The function then outputs the results by using the Update() function for the two output ports.
If we build this, and look in the asset browser, we can see the node in the ?Uncategorized? section as expected:

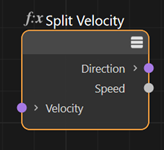
Dragging the node into the node editor shows its interface from the description we created:
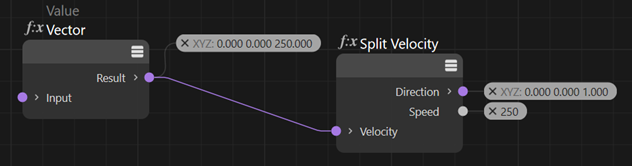
We can link a Value node to the Velocity port to provide a vector. If that vector has a value of 0,0,250 then the direction vector should be 0,0,1 and the speed 250. We can see this works correctly in this screenshot using the port inspectors:
So that is our new node. This is, of course, only a very simple core node and writing a complex scene node with arrays and geometry would be more complex. But it?s a start to build on.
The completed node plus source code can be downloaded here:
![]() Download the SplitVelocity node for R2023
Download the SplitVelocity node for R2023
Page last updated July 10th 2023