OSL shaders: part 5
Converting a Blender shader to Redshift
Recently I found a fascinating shader originally written for Blender and wanted it to run on C4D Redshift. I thought this might be of interest as another example of converting and improving an existing script from a different platform, which is what is covered here.
The shader is called 'Image2Screen' and was originally written by Francois Gastaldo for Softimage. He then wrote an OSL version for Blender, which is the script we're looking at here. Copyright remains with the original author who released it under the GNU GPL licence, so of course any changes made here are also released under that licence.
The author's web page, which gives the shader for download, a manual (in French) and a collection of RGB screen pattern files, is located here.
What it does
It is described as a 'Raster Screen Simulator Shader'. On a display screen each pixel is formed from three tiny sub-pixels which combine to form the visible pixel we see. If you examine such a screen microscopically, you can see the sub-pixels and what this shader does is to pixelate an image and (optionally) mask it with an RGB pattern to simulate a screen.
Here's the initial image, a spoof 1950s B-movie poster, that I'll use to test the results:
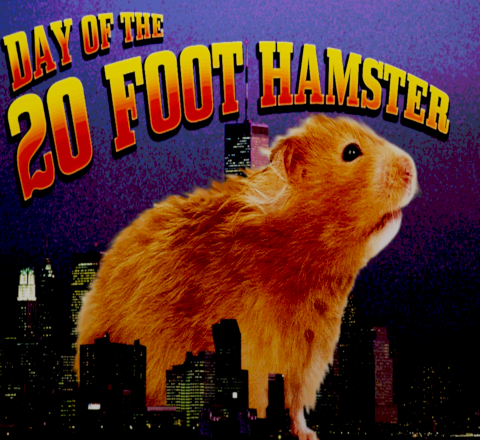
(Note: this image was created by me, following a tutorial in a book (see reference at the foot of the page). The copyright for this image is therefore a touch complex: part is by me, part by the book's author and part by wherever he sourced his images from! While I think it's fine under the 'fair use' principle to use it here for this purpose, it may not be fine elsewhere. So please be aware of these limitations.)
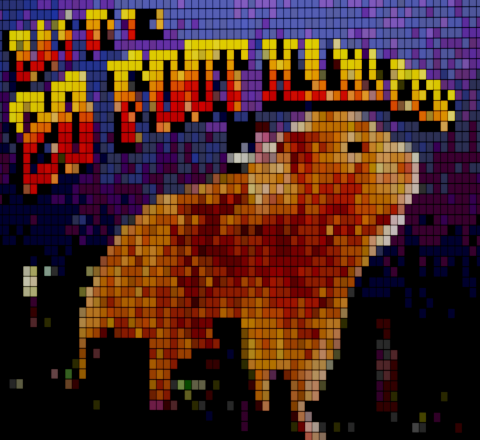
The shader can do three things. First, it can pixelate with no other changes, like so:
![]()
That's quite useful in its own right. But it can also leave a gap between the pixels to give the appearance of a grid, or grill:
And you can also specify a pattern file, usually based on an existing subpixel pattern, which is masked with the source image to give the screen effect:
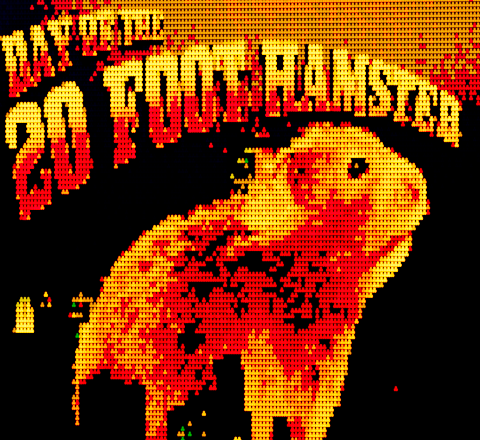
The pixelated resolution is higher in this image and the screen pattern used was the 'Amber Screen' pattern from the original author's website.
By varying the amount of pixelation you can vary the strength of the screen effect. All in all, a nice little shader. Can it work in Redshift?
Conversion
Here is the original script file as found on the author's site: download script.
If you load this into a Redshift OSL node, it will refuse to compile. That's due to these two lines:
#include "node_fresnel.h"
#include "oslutil.h"
If these are missing on your system, Redshift will stop when it can't find them. In which case you will have to source them from somewhere else. I can't include them here, but oslutil.h is part of OSL itself, to which the source code is available. Go to the OSL source on Github and you will see the file, which you can download. The file node_fresnel.h is part of Blender Cycles, and again, the source code is available. Find it in the Cycles source on Github and download the file.
Once you have them you need to put them where Redshift can find them. This can be in the same folder as the script (.osl) file, but a better place, so they are available for other scripts as well, is in the Redshift program data. You can find this on a Windows system at C:\ProgramData\redshift and you should put the two files in the subfolder \osl\include. You will probably need to restart Cinema 4D to force Redshift to see these files.
The shader will now work, that's all that is needed to get it to function. However, there are some usage quirks which you need to know about for all the features to work. The converted script for download has a readme.txt file giving this information, so I won't reproduce it here. But there are some other improvements we can make.
Interface
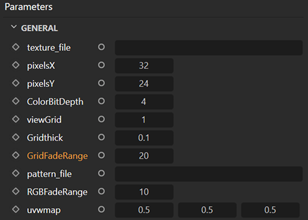
The shader interface looks like this:
Redundant parameters
You will see a parameter 'viewGrid' in the interface and if you change it, nothing happens. In fact, looking at the code you can see that this parameter is unused. I assume it was intended to switch the grid and off easily, but it is non-functioning and the easiest thing to avoid confusion is to delete it.
In the source code there is also a commented-out parameter 'Opt_Image' which we can also delete.
Parameter range
There is a parameter 'Gridthick' which is, as the name implies, the thickness of the grid lines. A value of zero removes the grid completely; a value of 1 turns the image black. So we can set the range for this parameter to 0...1 like so:
float Gridthick = 0.1 [[ float min=0.0, float max=1.0 ]],
We can do the same for the 'ColorBitDepth' parameter. The only values which make sense are in the range 0 to 32, so we can do this:
int ColorBitDepth = 4 [[ string label = "Color Bit Depth", int min = 0, int max = 32 ]],
Filename widgets
There are two filename entry controls in which you have to type the filename of the file to use. We can use filename widgets instead, much nicer for the user, like this:
string texture_file = "" [[ string widget = "filename" ]],
string pattern_file = "" [[ string widget = "filename" ]],
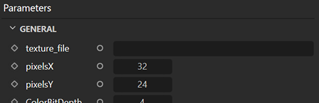
However, you might not want to do this. The reason is that in the Redshift implementation, adding a filename widget adds a large set of controls to the interface. For example, here is the 'texture_file' parameter in the original version:
But when the filename widget is used, we get this:
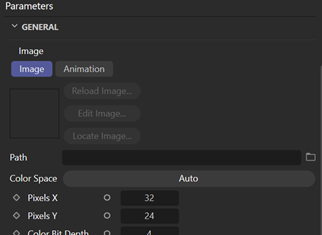
That's a lot of extra screen real estate. It's a pity Redshift didn't see fit to make this group of settings collapsible with only the 'Path' field visible until expanded. Since there is also the 'pattern_file' parameter, the interface will become very long and it can be awkward to find other parameters amongst all the image settings. You could of course move the parameters around so that the two files are at the bottom with all the others coming first. That's what I've done in my version of the script and it does seem to give a reasonable balance between ease of use of the filename widget and the extra screen space required.
Naming conventions
It's nice to use the same naming convention for all the parameters. This script uses camel-case for some, all lower-case for others and a mix of upper and lower case for the rest. I'm going to stick with mixed upper/lower case for all of them but rather than renaming the variables and having to edit the code, we can use the label metadata. For example:
float pixelsX = 32.0,
becomes
float pixelsX = 32.0 [[ string label = "Pixels X" ]],
Weirdly, the label metadata does not work for output parameters, the variable name is always used. You can see this in the converted file, where the three output parameters have the label metadata set, but this is ignored for all three. Go figure.
It has been said that giving a different name to the variable compared to what appears in the interface is a no-no, but frankly most users won't ever look at the source code of the shader and as long as the variable name isn't totally different from the label, those who do shouldn't have any trouble.
Completed conversion
You can download the final version of the converted shader on the shaders download page. Don't forget that you need to find and install the files oslutil.h and node_fresnel.h before this will work.
Reference
The source image tutorial came from this book:
Caplin C. Art & Design in Photoshop. Elsevier, Oxford 2008.
<-- Part 4: Light-emitting shaders
Page last updated July 31st 2025