Creating a core node: 3
4. Adding description elements
If we were writing an ObjectData plugin, the first thing we?d add to the description would probably be:
INCLUDE Obase;
This adds the basic object properties. For nodes we do the same, in this case by adding a description called net.maxon.code.base. To do this, we add a new attribute (Attribute?Add Attribute) and from the list of possible attributes which appears we should choose ?New Attribute? since we don?t want one of the predefined types. Several new lines appear in the ?Layout? section:
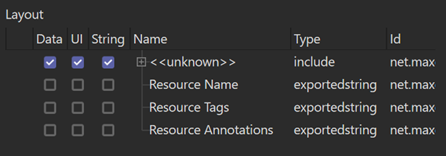
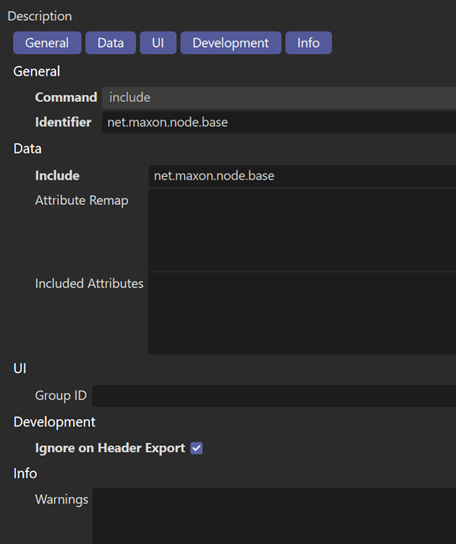
We can select the line labelled <<unknown>> and a number of settings appear in the right-hand pane. We need to change Command to include and type the name of the description to be included, which we know will be net.maxon.code.base, in the Identifier field. We don?t want any of this included description to be added to the exported header file, so we check the switch Ignore on Header Export. The result is this:
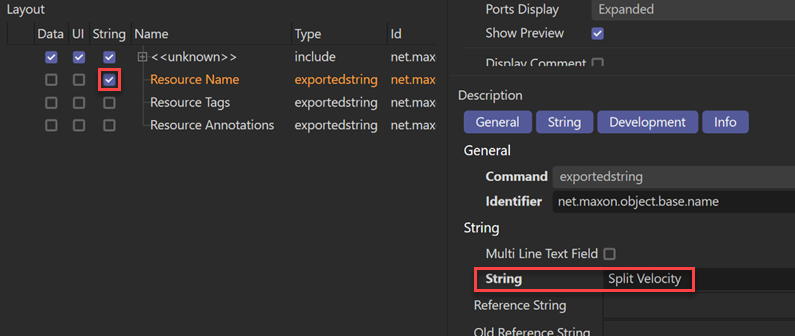
Now we can give our node a name, so select Resource Name in the Layout section, check the switch in the String column and then type the name of the node in the String field. Now we have:
If we save the changed database we now have two .json files in the res/nodes folder; the original database root file and another, uk.co.microbion.splitveldb.db.en-US.json. This is the locale-specific file which has been created now that there are strings which are going to vary between the supported languages.
At last we can add the ports we need. We?re going to need three ports: an input vector, which is the velocity, an output vector for the direction, and an output float for the speed. We do this by using Attribute?Add Attribute as we did for the included description.
If we click Attribute?Add Attribute again, we can choose a preset type; in this case, Vector3 will be fine. This appears at the bottom of the list and several fields are filled in for us. We can drag and drop the attributes in the Layout section to reorder them if desired, but there?s a caveat.
The problem is that as soon as you drag and drop an attribute to reorder the list, all the attributes are moved above the Resource Name and subsequent lines, and most of the completed fields are replaced by defaults. This is infuriating and looks like a bug in the resource editor. The only solution to this is either to remember to add the ports in the order in which they are to appear in the node?s interface, or rearrange the order before setting any of the parameters ? otherwise, you?ll have to do them all over again.
Anyway, we now have a vector attribute added but we need to make some changes. These are:
- change
Identifierto something more useful, in this casevelocity - change
ClassificationfromNonetoInput, since this is an input port - change the
Group IDto the group in the interface where we want the node to appear; this probably doesn?t matter for the ports in the node editor, but it will look neater in the attribute manager. We want this port to be in the inputs group, so addnet.maxon.node.base.group.inputsto theGroup IDfield - change the
Stringfield, which is the port name which will appear in the node editor and which isVector3at present to something more meaningful ?Velocitywill be fine
That completes the changes for this port.
Now we can add the output ports. We first add a new Vector3 attribute; the identifier should be direction, the classification is Output, the group ID is net.maxon.node.base.group.outputs and the name string is Direction.
The final port is a float, so we add a new attribute and choose the Float type. In this case the identifier should be speed, the classification is Output, the group ID is net.maxon.node.base.group.outputs and the name string is Speed.
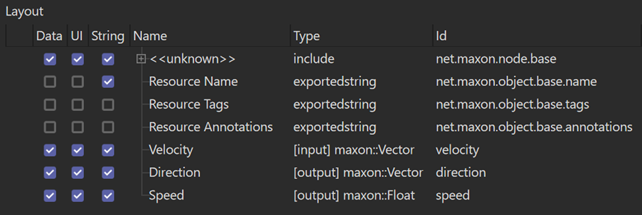
That completes the description so we can save the database again. The final layout should look like this:
At this point we need to export a header file to include in the code which will identify the ports that are used for the code we are about to write. To do this, we deselect any selected entries in the layout, and in the right-hand pane scroll down until we find the Export section. In the Include File field, we should be able to use the browse button at the right-hand end of that field, and select the header file to be written. However, the file doesn?t exist yet, so we can?t do that. What we?ll have to do is enter the path manually to the file we want the resource editor to create.
Unfortunately we can?t use a relative path because the resource editor will assume that means relative to the Cinema 4D executable location. That?s silly, because no-one would build plugins directly in the Program Files or Applications folders (would they?). So it has to be absolute path. In my system, it would look like this:

Now we can use the menu entry Database?Generate/Update include files (active db). When I do that on my system, firstly I get some weird error to do with Redshift, which I haven?t touched at all, and then another error like this:
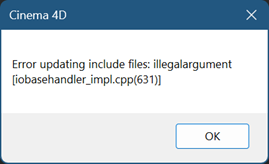
Simply put, the resource editor just will not write the header file. If we try the simple core node example supplied with the SDK, modify the description and try to update the include file, the same error occurs. Hopefully this will be fixed in a later version of Cinema, but in the meantime the only way round this is to generate the include file by hand.
The problem with that, of course, is trying to figure out the format required. Fortunately the SDK has an example called ?simple core node? whose source is in the maxonsk.module/source/nodes folder. We need the file corenode_descriptions.h and we can copy this to the source folder for our node and rename it to something else. I called it splitvel_descriptions.h.
There are a few things we need to change. We should probably change the header guard from CORENODE_DESCRIPTIONS_H__ to something else, say SPLITVEL_DESCRIPTIONS_H__. If we look at the auto generated section, we can see that there are three nested namespaces. This is because there might be more than one node in the plugin we?re building, so the description values have to be separated from one another. In this line:
MAXON_RESOURCE_DATABASE_SCOPE("net.maxonexample.node_corenode.simplecorenode");
There is the description ID and the namespaces are named after the three final sections of that ID, so as in this code snippet:
namespace maxonexample

      {
      ??namespace NODE_CORENODE
      ??{
      ????namespace SIMPLECORENODE
      ????{
We have already named our node?s description as uk.co.microbion.splitvelocity.splitvelnode so the three namespaces can become:
namespace microbion

      {
      ??namespace SPLITVELOCITY
      ??{
      ????namespace SPLITVELNODE
      ????{
The commented lines we can leave alone, the meaning or significance of those is unknown. Then there are two attributes. Our description has three attributes so we can change the existing ones to reflect their IDs. In this case it will look like this:
MAXON_ATTRIBUTE(maxon::Vector, VELOCITY, "velocity");
    MAXON_ATTRIBUTE(maxon::Vector, DIRECTION, "direction");

		MAXON_ATTRIBUTE(maxon::ColorA, SPEED, "speed");
Finally, when the code is compiled two header files will be generated and must also be included. These are the two #include lines at the end of the file. We can see that the names are derived from this header?s name, so we can rename them to:
#include "splitvel_descriptions1.hxx"

      #include "splitvel_descriptions2.hxx"
That?s it, and the file can be saved. This manual editing will work fine for such a simple node but more complex databases with multiple descriptions may result in a much more complex header, so hopefully the resource editor will be fixed soon.
Now we can go back to the plugin and add the code which will implement the node function. That is covered in the next page.
Page last updated July 10th 2023